
Our Daring Bakers Host for December 2011 was Jessica of My Recipe Project and she showed us how fun it is to create Sour Dough bread in our own kitchens! She provided us with Sour Dough recipes from Bread Matters by Andrew Whitley as well as delicious recipes to use our Sour Dough bread in from Tonia George’s Things on Toast and Canteen’s Great British Food!
Reading up on the sourdough making process got me thinking that it couldn’t be that hard and perhaps my lack of success in the bread making department will finally be overcome. I decided to use an Organic Rye Flour that I found in the local supermarket.


May 2012 be the year when I finally get the perfect loaf!
Sourdough Starter
Ingredients & Method
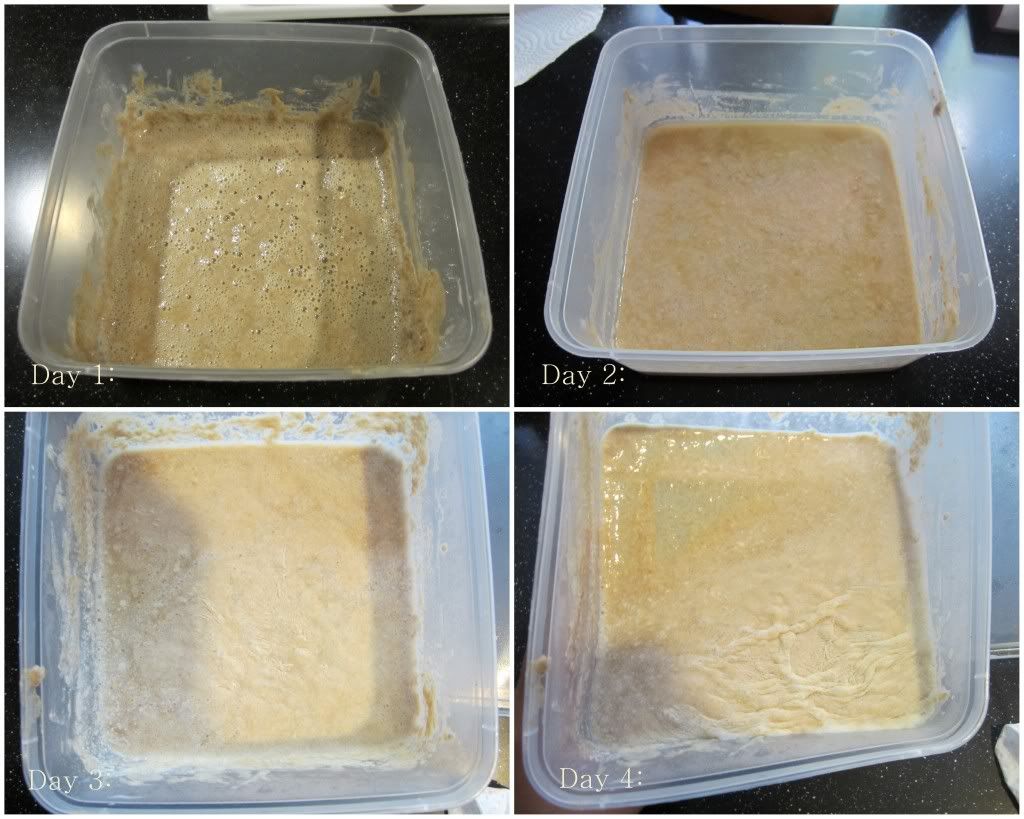
Day 1;
3 tbsp plus 1 teaspoon whole rye flour
¼ cup water
In a plastic container, mix the flour and water into a paste. Cover and leave the container somewhere warm. The dough should be sloppy and runny, which will bubble and ferment as it grows.
Day 2;
3 tbsp plus 1 teaspoon whole rye flour
¼ cup water
Stir the ingredients into the container. The dough start to emit a yeasty smell.
Day 3;
3 tbsp plus 1 teaspoon whole rye flour
¼ cup water
Stir the ingredients into the container. The yeast smell became stronger, almost sour. Bubbles started to form.
Day 4;
3 tbsp plus 1 teaspoon whole rye flour
¼ cup water
Stir the ingredients into the container. The dough became watery and a thin liquid layer formed on top.
Production Sourdough;
¼ cup less 2 tsp rye starter
1 cup plus 2 tsp rye flour
1¼ cups water
Mix everything into a sloppy dough. Cover and set aside for 12-24 hours, until bubbling.
Final Dough;
2 cups production sourdough
2 1/3 rye flour
0.5 tsp table salt
¾ cup plus 2 tsp water
- Mix all ingredients together to form a soft dough. With wet hands, scoop the dough out and place it in a well-greased loaf tin. When greasing use hard fats such as butter.
- Put the tin in a large plastic bag, blow it up to form a dome and tie tightly, ensuring the dome remains. This is essential so that the dough can proof.
- The dough will be ready for baking anytime from 2-8 hours, depending on the temperature. For my first loaf, I left it to proof for 9 hours which proved to be far too long. The second loaf was only proofed for 5 hours. The dough will be ready to be baked when it doubles in size.
- Pre-heat the oven to a very high temperature of 240C. Bake for 50-60 minutes. After 15 minutes, reduce the heat to 200C and continue baking for the remaining time.
- Leave the bread to cool for a DAY before slicing.

The photo above shows the production sourdough from my initial attempt and my second attempt. There is a huge difference in the appearance namely the lack of bubbles in the first one.